


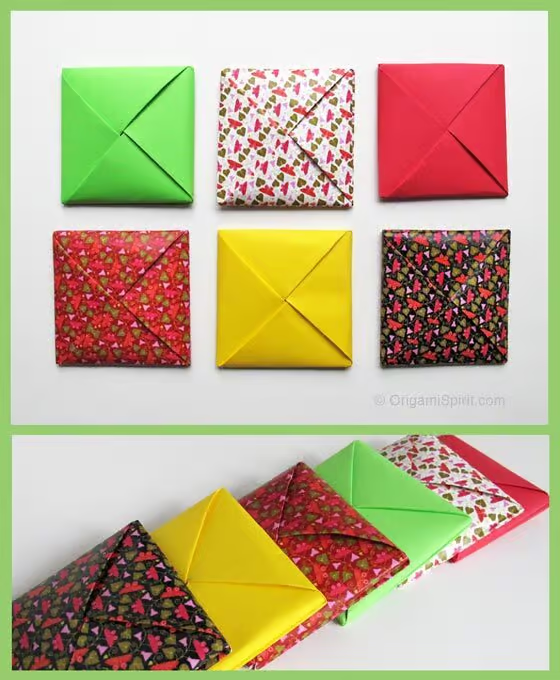
This origami envelope is a traditional origami (Menko) from Japan. It looks plain and simple, and it is! But don’t let such simplicity deceive you and maybe even prevent you from folding it.
The process of making this origami envelope is a short and peaceful folding meditation. Engaging with it will help you unwind and relax after a day of hard work. I promise that once you make ONE you will want to make many. Just breathe long, take it easy, and let the worries in your world drop away.
Once you’re finished learning this model you’ll hold a classic and elegant Japanese origami model in your hands. Invite some peace into you life.
Here you can watch the video demonstration and fold the Menko along with me. It will be a delightful six-minute period in our day!

Suggestions and Tips
If you’d like to use this origami envelope for a practical purpose here are a few ideas.
- Find some beautiful origami paper, fold it, place needles and thread inside, and carry it in your wallet or bag. This simple sewing kit will come in handy at some point. Believe me!
- It is also useful as a lovely origami packet to hold seeds to give those friends of ours who like to garden.
- Use it to send a secret love note… don’t we all at times need sweet, lovely words to take us out of the doldrums?
- Use it to hold an invitation… a perfect origami model for a wedding party or even for a party of two!
The finished Menko is a square whose sides measures a third of the square piece of paper started with. For example: a 6″ x 6″ piece of square paper will yield a 2″ x 2″ square envelope.
If you think of other uses for this little origami envelope,
please share it with everyone in the comment section below.
. . . . . . . . . . . . . . . . . . . .
Would you like to learn other origami boxes, containers or envelopes?
Click here for origami video instructions.
Leyla, I have an old leather coin holder with eight sides and realized this can hold coins too. The double layer helps hold small parts for assembling projects with screws and more and can be labeled easily on the paper. I liked Jessica idea to attach them by cutting an X in the back but not sure of how the last idea works . I saw this on pin interest and my former origami desire is stirred up again. Thank you. Steve
Hi Steve,
Very happy that your origami enthusiasm has been stirred up. Welcome to Origami Spirit!
Leyla
Leyla
This envelope can also be a pin wheel by leaving the top flaps open and putting the fold against the square creating a diamond shape at 90 degrees. I would think the common pin wheel by folding 4 sides halfway to center and flattening the corners making four triangles facing the same circular dirrection is know by many but the envelope design is stronger at the center for spinning.
Steve
Great discovery. I’ll have to try it. Thank you for adding this idea here, Steven.
I have just started making ceramics. I will use the enveloppes to give away some round earthenware disks used to keep brown sugar or dry fruit soft. Thank you for sharing this video.
You are welcome. I’m happy you can use the envelopes for your gifts. :-)
These are great! I made them as Christmas gifts for my grandchildren and put money in them. I also put a little slip of paper inside with a link to this site so they can make the envelopes themselves.
Great idea, Lucy. Thank you for sharing it here!
I will use this to put my student’s lost tooth in so they can take it home safely. I teach first grade, and I will use it a lot! Thank you for the clear and easy instructions.
What a wonderful idea, Kim! Thank you for sharing it with us. Welcome to Origami Spirit!
I use it to store seeds :)
Thanks so much for this clear (and very relaxing to watch) tutorial! I’ve recently started making eco-friendly silver jewellery, and these menko make the perfect unique packaging for my pieces! I use sturdy recycled Kraft paper which enables me to hand-paint my logo onto them. Everyone who buys my jewellery is so delighted with the little box that they get to keep as well. Thanks again! :)
Hi Kezzi,
I’m so happy this menko envelop is of use to you in your jewelry business.
Thank you for sharing with us how you use it!
Leyla
Thanks a lot, nice, well explain ! Bravo
Thank you Dianne. Happy the menko worked for you!
Thank you Leyla for the instructions, they were very helpful. I am using the envelopes for seeds, herbs and spices, buttons.
You are welcome Magda, And thank you for sharing how you’re using this envelope!
Thank you Leyla for your instructive video on how to make a traditional origami envelope. I just finished making these origami envelopes for my Bible study group. I added a scripture verse and some seeds, as the scripture verse I included was about planting seeds. The traditional origami envelopes were very well received by those in the group.
Other ideas for these traditional origami envelopes include adding a heart-shaped piece of chocolate or a sprig of mistletoe for Christmas.
Leyla, thank again for taking the time to make the video on how to make a traditional origami envelope. They are easy to make and make great gifts.
I’m happy you like this and love the meaningful way in which you used it. Thank you for sharing!
This was the best origami tutorial! Great instructions and easy to follow! Thank you!
Thank you Andrea, I’m Happy you like it!
I cut a 12 inch x 12 inch down to 10 inch square and then used that to make an envelope for $50 bill that I had folded into a heart.
Hello! I’ve come across your instructions multiple times looking for a variety of folding paper needs. Yours are always so easy to watch – thank you!
I don’t know if it is the ‘common’ use of this fold, but my friend taught me this years ago and I made boxes and wall art from it by slitting the back and gluing together. I had forgotten the fold, though, and only knew it as “japanese mat fold” because you make a paper mat from it, so I am so glad I found your video to remind me!
She showed me to cut an X on the flat back of the folded up menko (so you get 4 triangle tabs that open out while the front stays folded.) These tabs you insert into adjacent ‘menko’ and glue in place. Glued together they make beautiful textural looking ‘mats’ – we put these on the wall as art.
Also, you can make boxes from the same slit back triangle tab technique – just glue the ‘sides’ of the boxes together first, then glue them at the angles to create the box shape.
I will try find some photos of these works to send you. Thank you again – I thought I’d never make these again due to my poor memory!
Hi Jessica,
I think that I have read about what you are describing for the menko. I don’t know if I have seen it, but I’ma curious now. I can imagine they look beautiful.
If you find photos please do send a link. Thank you for writing!
Leyla
Thank you so much Leyla, for offering your stylish & authentic way of creating Origami, just exactly what i was looking for and it brightens up the soul :)
Love , Stefanie
Wonderful idea Leyla. I loved it a lot. Very easy to make and an amazing model. We could actually store some money in this envelope. It will come in handy for sure. We could store coins too. When we want to buy something from the market, we could just fill this envelope with some money instead of carrying a big wallet. It is small and is easy to carry. I would be extremely happy if you share this with your friends. Thank you so much.
Hi Leyla,
Thank you for your great tutorials. I shared this one on my blog because I made a card with this model and wanted to show other peopel how to make this.
http://wiescreablog.blogspot.nl/2015/07/kerstkaarten-2015-kaart-37_30.html
Hi Wies, Your blog post and photos are delightful. Thank you for sharing this menko fold and for sharing the link so that we can visit it!
A BIG BIG thank you, long time I have been to your website, the best ever seen about origami, very clear, well explained, beautiful and useful origami… I love to do origami mostly simple ones and practical…I was looking for some seeds bags origami as it is the time to collect flower seeds…
To thank you, I would like even to send you some seeds if you would like some, in case you have a garden… Please let me know, it would be a lovely way to thank you from sharing your great origami skills that you share so generously.
warm wishes
Patricia
Hi Pat,
Thank you for your nice words. I’m very happy you’ve liked what you find here in Origami Spirit.
I have featured another super easy envelope that would be great for seeds too.
Here is the link in case you missed it:
https://www.origamispirit.com/2013/08/make-a-gift-envelope-in-less-than-two-minutes/
I do have a garden and love to receive some seeds.
My address is on my contact pate: https://www.origamispirit.com/contact/
Thank you for writing!
Leyla
Thank You Leyla
I’ve been trying to find a simple yet mildly secure means of holding trinkets, coins and the like as a means of presenting gifts and keeping things separated for specific purposes (fifty dollar bill for this weeks movie run set aside in plain sight as though a simple decoration until time to go.) what ever comes to mind. “Oh look honey. You just walked right over this. Did you notice it? Look how intricate it is. fells a little heve for a simple wad of paper why don’t you open it out flat and see if any thing is inside.”
Very funny Kleatus!!!
Leyla,
Just found your video(s). They are super! Many thanks for the effort you make to provide us with comprehensive, easy to follow instruction! I make Chinese Sewing Books, (Zhen Xian Bao) and this will certainly be part of my folded paper arsenal from now on!
Hi Leyla,
Thank you for the video! Your tutorial was really easy to follow. Will be teaching my students how to make menko. I am sure they will be love it.
Ai Rin
Hi Ai RIn, I’m glad you like it and will share with your students!
Thanks for the tutorial! Simple and easy. Used this for collecting ‘raffle tickets’. Once again, thank you!
– Laura
Raffle tickets… good idea, thank you!
Thank you for the video! The tooth fairy used this to enclose coins.
Hi Shelly,
I’m happy the Tooth Fairy found a good use for this envelope.
Thank you for sharing!
What a treasure trove of origami love and spirit I have now found amongst your website <3 …. I make my first menko, and to put in him I put some small origami paper, so I can have it in my bag, to make my baby cranes for Senbazaru :)… it will keep it nice and tidy! Origami within origami. …. Heehee!
I am using this envelope for a Christmas present for a tea drinking friend. I have purchased various loose leaf teas and will encase each on in one of the envelopes and put them in a decorative mug with other sweet treats. Thank you for the great instructional video!
Lovely, thank you Susan!
I have been experimenting with different handmade box, pouch and bags for the past few days in paper and cloth. This is eighth design I tried. I love this box! The seams are perfect, no gluing required and simple to make in a few minutes. I have made in origami and scrap paper (12 x 12). The key to nice lines on heavier paper is using a bone folder. Much Thanks. Will be using your design to package handmade jewelry.
hi Mrs. Torres, i know this is the wrong video but on the origami printable designs does it use a lot of ink when you print it.
Thank you!
http://www.meganhicks.com/images/wearables/wear04.jpg
Hi Leyla —
Thanks so much for this blog. Every time I get a notification of a new post, I follow the link immediately. I love your tutorials. They’re beautifully produced, and your pacing is perfect for following along.
For years, I’ve been using the menko as a “bead” for earrings. I start with paper that’s 3″ square. For a neck piece, I’ll use 5″-6″ inch squares. They’re elegant, lightweight, classic. It’s one of my favorite origami earring designs.
Hi Megan,
It sounds like a very creative way to use the menko. If you have a link to a foto of your earrings, i’d love to see it!
Gracias por compartir tan bien tus habilidades y conocimientos. Soy docente jubilada, es este el momento de disfrutar con mis nietos esta hermosa técnica de trabajo con papel. Siempre desee hacer un curso pero no encontraba quién me enseñara. Un beso grande desde La Plata, Argentina.
Hola Dedalina, bievenida a Origami Spirit. Que lo disfrutes con tus nietos!
Hi Leyla!
Thank you for this tutorial, your clear directions make this envelope a pleasure to fold (my desk is now covered in them!) I am impressed by how secure and compact the envelope is, and how many uses it could have, both practical and in gift-wrapping (it would be such fun for someone to open!)
Here are some of my completed ones: http://pinterest.com/pin/349380883562741666/
I was also inspired by this envelope to make some flower designs! they are based on the partially complete model and can still hold a message inside:
http://pinterest.com/pin/349380883562741833/
http://pinterest.com/pin/349380883562741895/
So far I have used the envelope to gift-wrap beaded rings, safely keep broken jewellery together, carry spare hair pins + hair elastics, carry spare teabags, store sequins and tiny shells.
Thanks as always for bring inspiration through your site Leyla,
all the best, Rose
Dear Rose,
Such lovely ideas! It looks like this menko is full of possibilities. Carlos Montenegro also suggests to make a lotus flower by opening the menko as you did, and nesting smaller ones inside. Stay tuned to my coming post for another origami model made from the menko. Thank you for sharing your creativity here with us!
Leyla, podemos tb colocar saquinhos de chá, fazendo assim belos convites para um chá de bebê, ou mesmo chá de cozinha.
Querida Leyla, seu trabalho é maravilhoso! Eu adoro seus vídeos e aprendo muito com você!
um grande abraço de uma origamiga brasileira!
Obrigada Léa!
I love these little envelopes-so quick and easy to make. I wish I had known how to do these when my children were younger. These little packets would have been perfect for them to have used for the tooth fairy! Put the little tooth in the envelope, put it under their pillows, and await her arrival. I am also thinking they would be beautiful with a monogram sticker on the front and used at weddings to hold rice or birdseed They could also be used for holding a special candy treat and placed on a guest’s pillow. Thank you so much for your wonderful videos. They are the highlight of my week!
Wow Bonny! All great ideas. I will have ti make a list and add it. The Tooth Fairy. .. so sweet!!
How about a CD envelope? A 15″ square works well. I used heavier marbled paper. Mark 5 ” on one edge if you don’t want to fiddle with an S curve. I’ve seen this before in an old book, but Leyla, you make it more interesting, the way you present & demonstrate. Thank you.
Hi Kathryn. I love your idea and instructions to make it into a CD envelope, thank you for sharing the exact measurements.
Loved the video. I ran my origami paper through my printer and printed a birthday wish on the little square inside. It will be a real surprise for my friends who have June birthdays.
This is a lovely idea, Susan. Thank you for sharing… My birthday is in October ;-)
Thanks a lot for your origami envelope ! Greetings from Costa Rica in Central America! Do you have any video with two colliding cubes?
Greetings from Costa Rica in Central America! am so excited about learning new items in origami tecnics from you! The origami envelope is beatiful and simple to learn. Thanks a lot! Do you have some video about two colliding cubes?
Boa noite!
Os modelos que apresenta são sempre muito sugestivos e bonitos.
Grata pelos ensinamentos, que são sempre realizados de uma forma muito esclarecedora.
abraço
Hi Leyla,
This envelope has been a favourite of mine for a long time, I find it really addictive to fold.I have never seen this way of folding it, but can’t remember where I initially picked it up. From tiny ones to larger ones all great fun. Use rubber stamps on the folds, then unforld and put together again, keeps children intrigued. As for stuff to hide inside…. postage stamps, mini photos, stickers, coins, address labels are a few that come to mind. Rich Beech transforms it into a folding purse, but you probably know this and will show us another time. It’s always such a pleasure to find one of your tutorials in my inbox.
Cheers,
Renee
I started with your little frogs and made 7 then your accordion box,i’d to stop with 5 as i didńt have enough réversible paper.yesterday made the éléphant which i found difficulté yet your vidéos are perfect.And just now enjoyed making the envelops .thank you it´s great fun.y.s
Great Busir, I’m happy you are enjoying the videos!
Leyla, This is a lovely, clever model and your tutorial videos are so concise and easy to follow! These are very nice little purses that would serve well to uniquely deliver cash for gifts or gift cards for stores or restaurants, among loads of other things. Thank you. I will be using this model, for sure!
Thank you Marsha, for sharing your ideas with us!
I just thought it would make a lovely potpourri holder which could then go into a lingerie drawer or the linen cupboard.
Thanks for the easy to follow video Leyla, I look forward to your posts.
Potpourri in an origami evelope to place in a drawer! Ohh I like it Maya. We could distribute potpourri-filled holders as favors at our next tea party for our lady friends.
Thank you for your lovely videos, Leyla. I am new to origami and I am enjoying your tutorials so much. I can’t wait to make this envelope…when my cat moves from in front of the computer I’ll be able to. :)
Hi Katrina, I know every thing about a little kitty in front of my computer:-) He might want to learn how to fold paper too… perhaps you want to fold the little envelope and place a treat for him inside it. It will be a game for him trying to open it…or would it be too much torture for him…hmmm what do you think?
Leyla, I am a subscriber of your blog, I love origami, and specially like the way your demonstrate the procedure of how to fold in each step, the speed is not too fast or too slow to follow, very precise and simple to understand, even younger people can easily pick up the basic skill to entertain them. And most important is that most of the figures you teach we do not find in anyway else. They are new to me, although origami has been one of my favorite hot searches at all times. I am very much in love with this Menko today, I can’t help but write this comment, many thanks for sharing and teaching.
Hi Edna, thank you for your kind words and feedback. I love been able to teach origami through these videos, and appreciate hearing back from people, even when it is about things that might need to be fixed or improved.
But it is very satisfying to hear that you are learning fine using them as they are. I have plans to remake a couple of videos to clarify some parts. Any way… Thank you again!