Feeling stressed? Relax with an easy-to-follow origami tutorial.

VIDEOS FOR BEGINNERS!

Build connections! Create memories with children of all ages. For suggestions...

TOYS AND ACTION MODELS!

Don't be frustrated! Master Origami basics! Take our FREE origami intro course.

SIGN UP NOW!

Video Tutorial – The Little Prince

A model design of Leyla Torres

Origami Model of the Little Prince, in paper. Designed by Leyla Torres

Do you like to fold origami toys and action models? You’re in luck! Here at Origami Spirit, we feature origami toys and action models we’re sure you’ll enjoy. You can find these origami models in this gallery >>> HERE

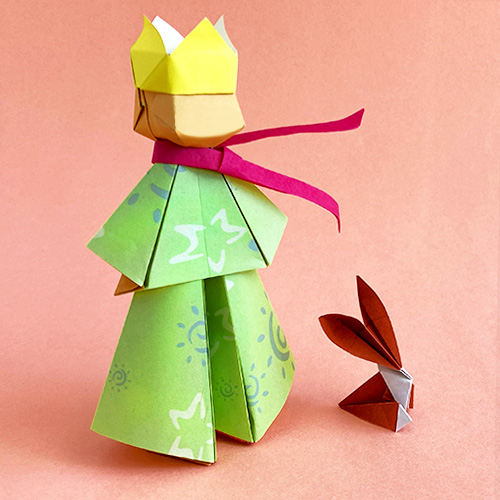
Learn to fold an interpretation of The Little Prince, the character in the classic book of the same name by Antoine de Saint-Exupéry. The fox in the picture was designed by Fabrizio Pianosi.

Since several pieces of paper are used to make this figure, and each piece is different in size and folding method, it’s considered “multi-piece” origami.

Would you like to learn how to fold this model? And the fox too?

The tutorial is found inside Origamigos, our sister site for members.

…and learn to fold The Little Prince and The Fox and many other models.

Already a member? LOG IN >>> HERE

Tips and suggestions for making The Little Prince

  • The Little Prince is made with five pieces of paper: one for the legs, one for the chest, one for the head, one for the crown, and one for the scarf. The following picture details the paper sizes. Keep in mind that all papers relate proportionally to the largest square, which is used for the legs. In the first video, you will learn how to trim the pieces for the head and the crown.
  • When you make this model for the first time, use a piece of paper that’s at least 8 x 8 inches (20 x 20 cm.) All the other pieces are proportionally related to the biggest square.
  • In the video, the legs, chest, head, and crown are demonstrated using kami paper. The scarf is made with tissue paper.
  • Ideally, the paper for the legs and chest should have different colors on each side (green/white, for example.) These pieces show both sides of the paper.
  • A drop of glue is needed to attach the pieces together. Links to suggested archival glue included in the post.

This is a selection of other origami tutorials you will find within Origamigos

Leave a Comment

Notify me of followup comments via e-mail. You can also subscribe without commenting.