
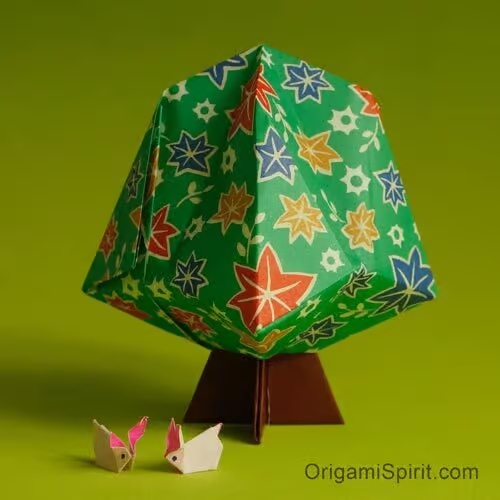
Trees symbolize the maternal attributes of protection, nurturing energies, stability, shelter and security. This puffy tree joins the collection of origami trees presented previously in Origami Spirit.
This origami tree can be a good complement to this origami house.
This origami tree is my own design and you can learn how to make it in the following video tutorial

Tips and suggestions for making this easy origami tree
- This origami tree is made with two pieces of paper. In the video the tree is demonstrated using thin kami paper, known in the U.S. as “origami paper”.
- Any other paper –such as gift-wrapping paper or printed paper from old magazines, is suitable.
- A good size for paper to begin with is 6 × 6 inches (15×15 cm) for the foliage, and 3 × 3 inches (7.5×7.5 cm) for the trunk
- The final figure shows only one side of the paper.
- If you can find the right colors you can make a tree representing each season of the year
- Pink or flower-patterned paper will represent a tree in spring’s blossom. Green paper will make a tree with a summertime feel. Orange paper will suggest fall foliage. White paper could represents a tree loaded with snow.
saya kira origami hanya bisa dibuat perahu atau bebek,, ternyata banyak juga yang lainya,, terimakasih tutorialnya !!
Leyla , has vuelto a publicar tus origamis .Que bueno !!!
Muito Obrigada. Gostei muito desta ideia.
Me alegro que hayas vuelto a publicar me encantó el árbol
Gracias Luz Elena, me alegra que te guste este árbol de papel.
Thank You Leyla,
Your step by step video was wonderful. Looking forward to trying. One Question – The cute little birds by the tree. Is there a step by step video to made them also?
PS: So, glad things are better for you!
Hi Gina,
The little creatures next to the tree are supposed to be rabbits ;-)
I don’t have a tutorial for them, but perhaps I’ll make one. It’s a traditional fold and requires one cut.
Que bueno que hayas vuelto. hoy precisamente estaba buscando el gato de tu blog porque los voy a hacer para halloween que puedas resolver tus asuntos mucho ánimo
Hi Leyla,
I have been concerned about you. I am so happy to hear from you.
The tree is very unique. I just viewed the video. I can’t wait to get my hands back to Origami. I didn’t have the spirit since you have been away for so long.
I hope all is well with you.
Thank you Pat. Here I am, happy to be able to share this tree with you. Life has been a little challenging lately, but in the challenges there are seeds of opportunity to grow and become stronger. Thank you for your warm words!
Oh, Leyla … I have longed to fold this sweet little tree; however, I have longed even more to see your hands and hear your voice to teach us once again! As always, a perfect tutorial made with love. Go girl :-)
Thank you Rosemary. Sometimes life can be a rollercoaster, but I’m happy I was able to finally share this little tree…. always with great love and appreciation for people like you who enjoy the work!