

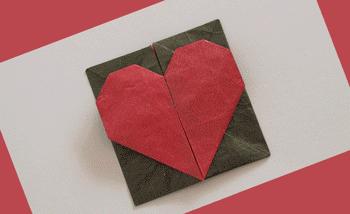
Something as simple as an origami heart can help us keep romance alive. And writing a love note to go with it will help keep the flame burning bright.
Give your next love note or Valentine invitation some extra sparkle by placing it within this easy-to-make origami heart box.
Since the heart and note can be folded flat, it can be discretely placed in our loved one’s purse or wallet for the unexpected moment and surprise discovery.
Origami artist Francis Ow (Singapore), creator of this charming model, has graciously given me permission to make this video tutorial.
Here are some other ideas on what else can be placed in the origami heart box.
- a dinner invitation
- a mischievous note ;-)
- a cherished memory
- a promise
- a coupon
- a ticket for a show
- a gift card
What else could we place inside this origami heart? Do you have any other ideas you’d care to share? Please leave your ideas in the comments.
PDF diagrams for this Heart box by Francis Ow, courtesy of Marc Sky.
***
Want instructions to learn more easy origami hearts? Read also:
Unique Ways to Keep Romance Alive – Part 2 (origami heart dish)
Unique Ways to Keep Romance Alive – Part 3 (origami heart stand)
Origami Heart Chain
Halloween Bat-winged Heart

:: :: :: ::
If you like what you see here, click here to subscribe to this blog
and receive coming posts with origami instructions and ideas via e-mail.
I add a small photo of my grandchildren for each of my daughters-in-law for Mother’s Day.
Lovely idea, Paula! Thank you!
It is really good and very helpful
I love this heart. It is really helpful.
Awesome…
Hello ! I woukd like to do exactly the same box that your but I can’t find the same paper white and red. Could you tell me where I could buy it. I leave in france and i hope I can find it whith internet .
thanks so much
Hi Anne,
I bought this paper in Germany at an origami convention.
I don’t know if the sell it online but here is a link to their website http://www.papierfalten.de/index_en.htm
This tutorial is so easy to follow! Thank you for giving such clear instructions. :) I plan on making a bunch of these for my partner’s birthday present. Thanks again for the tutorial and keep rocking!
Hi Ashley,
I am glad you like the tutorial. Origami is a lovely way to share our love and good feelings. Welcome to origami Spirit!
:)D this is cute and like a lil’/or liitle bit a 3,4,5,6,2,1,and/or 7 D girl hmmmmmm?????!!!!!!!
This is …..hmm?? huh beautiful !!!isn’t it hmmm???i Love this /or it /o that heart/hart box haha, thank(s )goodness!!!!!!!¡¡!!!!!!!¡¡!!!!!!! Love it much girl mwah 2x or x2 x2or 2X
This is …..hmm?? huh beautiful !!!isn’t it hmmm???
I was wondering if you could use 12 X 6 inch dimensions to make the heart box. I have 12 X 12 inch paper and it would be much more convenient. =] Thanks for the wonderful tutorial, I think I’m going to include these with my wedding invitations.
Hi Tiffany, Of course you can use 12 x 6 inch paper. You can try many different sizes as long as the ratio is 2:1
Best wishes!
This box is so complex but i was able to make it in one attempt :)
the instructions were given beautifully :D
Good practice! The more you do the better they’ll turn out :-)
Wow love these, going to make them for my daughters birthday invitations :) thanks
Nice idea, Shann. I’m sure that these as party invitations will work great. Thank you for sharing your idea here!
Hi how do we write the message inside? do u write it on a separate paper and drop it inside or do you write on the original paper itself?
Hi Vishnu, I usually cut a piece of paper of the same size as the bottom of the box. I write on it and insert it into the box.
This is by far my most favorable model. i keep adding it to greeting cards. i add arrows with instructions how to open the heart into a box. One friend called my card: “to save 4 ever:. she came with a name to put in the inside message. “You pull at my heart strings”. Thanks Leyla for presenting the video.
Denise
Hi Denise,
Thank you for sharing your enthusiasm for this box. I love it too! The message to put inside is perfect!
Thanks for this video – you make it really easy to follow. This is going to form part of my paper wedding anniversary gift :-)
Happy anniversary! Please share a photo with us when you fold it.
Such a beautiful Heart Box, and you made it so simple to make with your expert video intructions. Thanks a million.
Thanks for the tutorial! Looked at the video and taught it at the Westcoast Origami Guild today. Really cute model!
I shall try this, it’s beautiful. I made my own paper heart, but not origami. You can see it at http://happenence.wordpress.com/2012/01/31/paper-hearts/
The box is so difficult, but you make it seem so easy! I completed the box, viewing the video only once!
You are such a good teacher, Leyla! This model, as always, is impeccably demonstrated.
Many thanks to Francis Ow for his design. I had been folding the traditional pop-up-box /envelope with a few variations to make a heart shape on the front. It looked pretty good; however, it snagged at the top and did not fully open. This model has quickly been replaced by Francis’ model.
His design is so clever, elegant and easy. I have made 6 already this morning ;-)
Thank you both creator and teacher.
Rosemary
Love this one! Easy to follow because you explained it so well. Thank you!