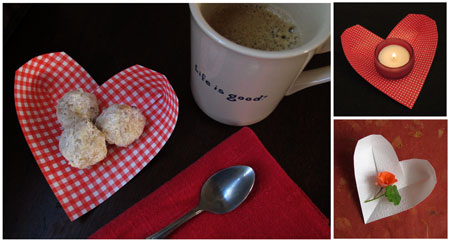
Do you believe that the secret of happiness lies in small shared rituals? Do you give importance to the small details of daily life? Making and giving origami hearts is an effective way to express our affection people we love.
This origami heart can be folded in less than a minute and is a fun Valentine craft project. You can use the heart to add charm to a unique moment shared with a special person.
Origami artist Ildikó Vass (Hungary) is the creator of this origami heart. She is also a teacher of children with special needs. Ildikó loves to create models that are easy to teach and can be part of home and daily life. Ildikó has kindly given me permission to make the following video tutorial of her origami heart.
This heart can be used on both sides. One side can be used as a decoration.
The other side of the heart is concave and makes a dish. It can be used to…
- serve cookies
- place a candle (don’t leave it unattended!)
- give a flower -Valentine’s or Mother’s day
- place a cup of tea or coffee
- write a love note for Valentine’s
- place a small gift
Have any other ideas on how to use this origami heart? Please share in the comments.
Do you want instructions to learn more easy origami hearts? Read also:
- Unique Ways to Keep Romance Alive – Part 1 (origami heart box)
- Unique Ways to Keep Romance Alive – Part 3 (origami heart stand)
- Origami Heart Chain
- Halloween Bat-winged Heart
:: :: :: ::
If you like what you find here, click here to subscribe to this blog
and receive coming posts via e-mail (They are FREE!)


Super lindo!
Bravoooooo super
Moniqued
Gracias por compartir el conocimiento
Another version – this time made from a circular paper plate instead of a square!
http://www.flickr.com/photos/61226719@N08/6936884045/
Just fold the plate in by about 1/3. Any more than that, and the resulting heart ends up a very strange shape.
Good experiment, David, thank you for sharing it here!
questi lavori con la carta sono molto belli complimenti a chi li ha fatti ciao da Giovanna.
gracias por esta maravillosa idea, soy menos que principiante, pero lo realize facilmente siguiendo el video.
Sencillamente adorable. Gracias por compartirlo.
Thanks for this – I shall be making these with my girls next week Simple but effective!
If you post photos of the hearts you make, please send a link!
Thank you Leyla for this tutorial..these origami heart shaped are lovely and right for
Valantine’s I will share your video on my blog soon….Bye :)
Thank you Stefania (What a beautiful name!)
http://ravanellorosapallido.blogspot.com/2012/02/quando-tu-sarai-vecchia-cioccolatini.html
I did it! Green heart shaped origami for my Chocolates :) Thanks to your tutorial !
:)
Thank you for this nice dish, Leyla (and Ildikó Vass :) )!
Awesome and easy, I made a tiny one from a small piece of paper, I will make some bigger ones and use them as snack plates for my daughters sleepover next month. The girls (age 11) will be thrilled.
Have a great sleepover party! If you post photos of the hearts you make, please send a link!
What an inventive lock fold… LUve it!
What a cute heart dish! I bet it would be a great substitute for paper plates! Pretty, creative, easy and you don’t have to go out and buy paper plates!
Yes! make it big enough and use a thicker piece of paper and we have a plate!
• You can decorate a tree with this heart: Click here to see a picture in Facebook
• It can be a chopsstick-holder. Click here to see a picture in FB
• You can use it in some other ways:
-Example 1 Click here to see a picture in FB
-Example 2 Click here to see a picture in FB
-Example 3 Click here to see a picture in FB
and, and,and…. :)
Ildikó,
What great examples of different uses for your lovely origami heart. I’m very proud to have featured this model in Origami Spirit. Thank you!
It’s very kind of You, Leyla!
• Combine two hearts to create a saucer(?): See a picture in Facebook
or
• Take a 55x55cm square, fold your heart and turn it upside down and front to back and do some finishing to create a bra or swimsuit like top: See a picture in Facebook
Excellent ideas Hans, thank-you for sharing!
So simple! And so practical, too! You don’t need giant paper to make something that can be really used.
I love it.
Yes David, and I love your idea of using it to decorate the corner of a card or photo too! The corner of the card slips easily into the back.
Here I link to your photo in flickr
Sorry Leyla, I accidentally deleted the one you linked to!
Here is a new link : http://www.flickr.com/photos/61226719@N08/6808275129/
(I hope – my flickr/facebook skills are terrible)
Sorry Leyla, I accidentally deleted the photo. I hope this is another link to it:
http://www.flickr.com/photos/61226719@N08/6808275129/
Thank you very much David!