Feeling stressed? Relax with an easy-to-follow origami tutorial.

VIDEOS FOR BEGINNERS!

Build connections! Create memories with children of all ages. For suggestions...

TOYS AND ACTION MODELS!

Don't be frustrated! Master Origami basics! Take our FREE origami intro course.

SIGN UP NOW!

Video Tutorial – “Eternal Flame Container” – Square version

A model design of Leyla Torres

Origami - Eternal flame container - Square Form - Design of Leyla Torres

Do you like to fold origami containers? You’re in luck! Here at Origami Spirit, we feature origami containers we’re sure you’ll enjoy. You can find these origami models in this gallery >>> HERE

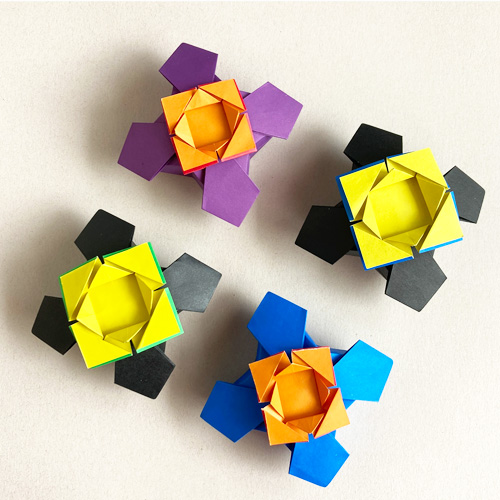
I developed this design as I revisited an idea shared in our Joy of Origami design course (Module 5, section 4). In this case, the basic design of the box was taken a few steps forward and I experimented with locks of different sizes. In the video shared in this post, we will make the square version of this container.

Human-created eternal flames have several symbolic meanings:

  • They often commemorate a person or event of significance.
  • They serve as a symbol of a spiritual belief.
  • They might be a reminder of the commitment to a common cause, such as peace or diplomacy.
  • Also, the flame is widely accepted as a symbol of eternal life.

I like to think of this Eternal Flame container as symbolic of our inner peace which we can manifest in our communities as we share the magic of origami. Each one of us can act according to our personal vision and choose our own cause when making this Eternal Flame container in origami.

Would you like to learn how to fold this model?

The tutorial is found inside Origamigos, our sister site for members.

…and learn to fold the Eternal Flame container and many other models.

Already a member? LOG IN >>> HERE

Origami - Eternal flame container - Square Form - Design of Leyla Torres

Tips and suggestions for making the Eternal Flame Container

  • To make the Eternal Flame container you need two pieces of paper, one for the container and one for the lock or flame.
  • When you make this model for the first time, use a piece of paper that’s at least 6 x 6 inches (15 x 15 cm.) for the container and 3 x 3 inches (7.5 x 7.5 cm.) for the lock (or flame).
  • In the video, the model is demonstrated using kami paper which is great, to begin with. You can use squares cut out of copy paperTant paper is appropriate also, and I personally enjoy it because it’s heavier than kami and the resulting container is firmer.
  • The paper can be of different colors on each side, or have the same color on both sides.
  • In the container, only one side of the paper is visible, but when the container is opened, the other side of the paper can be viewed as well.
  • The lock shows both sides of the paper.
  • Both the container and the lock are made from the windmill base. In the video, I show a special way to make this base to avoid marking unnecessary creases.

This is a selection of other origami tutorials you will find within Origamigos

[choose one of four pics of thumbnails. In the MEDIA window.Search <Origamigos_Tutorials_Thumbs> and choose one of those.]

Leave a Comment

Notify me of followup comments via e-mail. You can also subscribe without commenting.