Feeling stressed? Relax with an easy-to-follow origami tutorial.

VIDEOS FOR BEGINNERS!

Build connections! Create memories with children of all ages. For suggestions...

TOYS AND ACTION MODELS!

Don't be frustrated! Master Origami basics! Take our FREE origami intro course.

SIGN UP NOW!

Origami Video Tutorial – Boat Drawer Box

A model design of Leyla Torres

An origami model titled "Boat Drawer Box" designed by Leyla Torres

Do you like to fold origami boxes? You’re in luck! Here at Origami Spirit, we feature origami models we know you’ll enjoy so be sure to visit the ORIGAMI BOXES & CONTAINERS GALLERY

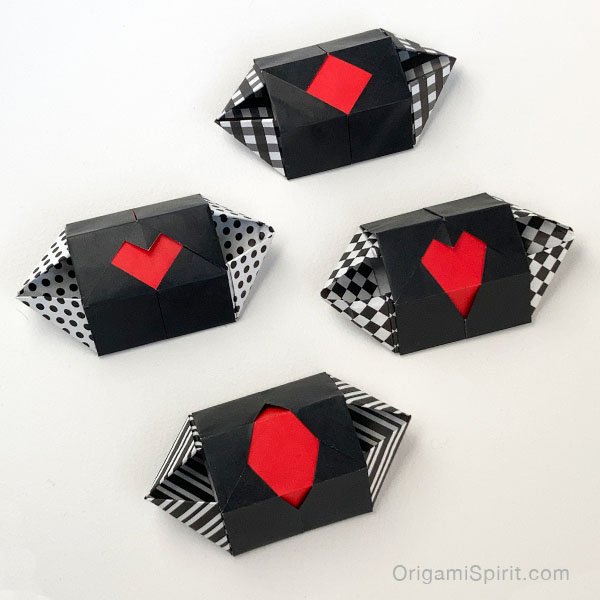
Boxes and containers always come in handy for gifts and just for the pleasure of folding them.

The Boat Drawer Box is a two-piece container: a boat-shaped drawer, and the sleeve into which the drawer slides. Both units are made with square pieces of paper of the same size.

  • The drawer is an adaptation of the traditional Japanese masu box, which is made from a square piece of paper. The paper for the example below is patterned on one side, and white on the reverse.
  • THE SLEEVE piece is quite versatile. Many variations can be made after completing some basic folds on a square piece of paper. The paper for the example below is black on one side, and red on the other.
  • In shape, the sleeve is related to boxes presented on other Origamigos posts including the Candy Coffin and the Advent Box. The process of making this box, the boat drawer box, is different allowing for many creative color combinations and shape possibilities.

Would you like to learn how to fold this model?

The tutorial is found inside Origamigos, our sister site for members.

… and learn to fold The Boat Drawer Box and many other models too!

Already a member? LOG IN >>> HERE

Tips and suggestions for making the Boat Drawer Box

  • Use two pieces of paper, one for the drawer and one for the sleeve. A good paper size to learn the model is 6 × 6-inch (15 × 15 cm)
  • The finished boat-shaped drawer shows mainly one side of the paper with the reverse side color in the interior.
  • The finished sleeve shows both sides of the paper.

This is a selection of other origami tutorials you will find within Origamigos

Leave a Comment

Notify me of followup comments via e-mail. You can also subscribe without commenting.