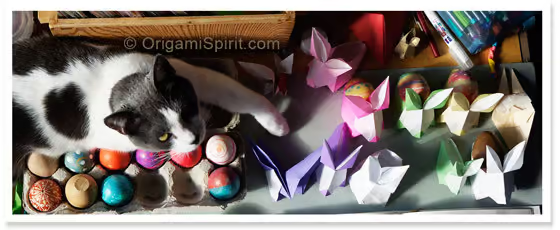
Coco sunbathes next to a box of Easter eggs, drying on my work table!
If you’ve ever folded an origami crane, you will be able to fold this origami Rabbit with ease. This bunny is a charming addition to other origami models for Easter presented at Origami Spirit.
This origami rabbit is a perfect model to hold a real egg that’s been decorated for Easter. All that’s needed are the desire to make the model, and an 8 x 8 inch (20x20cm) piece of paper.
The designer of this delightful bunny, David Donahue, has granted his permission to demonstrate this lovely creation in the following step-by-step video.
Tips and ideas for the Easter Origami Rabbit
- The paper can be a different color on each side, or the same color on both sides.
- If you use paper with different color on each side –for example, white on one side and pink on the other, start with the pink side up for a white-faced rabbit.
- Make more than one rabbit –They do tend to proliferate!
- Even if your first few origami rabbits turn out a little crinkly, making several of them will add to your paper-folding skills.
To dye Easter eggs
- In a plastic cup, mix together about 1/2 cup of water at room temperature, 1 tablespoon of vinegar, and about 10 drops of food coloring.
- Prepare one cup per color.
- Place an egg (hard boiled) in each cup of food coloring. Remove the eggs when they reach the desired shade.
- Use a spoon to remove the egg and place it on a paper towel to dry.
- You might want to wear plastic gloves to hold the eggs with your hands.
- For a bicolor egg, hold half of an egg in one color for a minute, remove and dry it. Turn it over and hold the other half in another color.
- Before dyeing the eggs, you can draw shapes or words on them with crayons or a piece of wax. The wax will repell the color and the designs will show through.
- For a tie-dyed effect, wrap rubber bands around the eggs (one at a time), leaving some of the eggshell exposed. Once you dye the eggs, remove the rubber bands.
- You might want to experiment with natural dyes to color your eggs.
. . . . . . . . . . .
Have you seen our selection of printable origami papers?
Click here to buy and download yours instantly


This is to hard the steps are imposible to do i cant even replicate it
Congratulations for trying the rabbit. I totally understand your frustration. Sometimes we need to grow our skills before we are able to make certain origami figures. You might want to try your hand at folding some of the models featured on this page: http://www.origamispirit.com/videos/origami-for-beginners/
But do go back to this rabbit and try again in the future. Our minds are elastic and work in mysterious ways. When we try more than once, relax into the process, take it slowly, we are rewarded with a successful ending. Give yourself some time.
I love bunnies and this the best way to show it!!!!
Leyla! There is no better word for the quality, clarity and thoroughness of your tutorial than “excellent”! You are a gifted instructor!
Of course i was smitten by the bunnies the minute i first laid eyes on them. And one viewing of the video and I was convinced I could make a bunny! Me! The person who is not a paper crafter and has never made one single origami fold in her life!!! So the three bunnies i just completed are a tribute to your skill!!
Although the link to the video tutorial is on the blog right now, i will be sharing it again WITH my results soon!!!
Thank you for all the time and effort and thought you are putting into sharing your expertise with all of us.
Hi Pam,
Thank you for your warm words and congratulations for making the bunnies…
Post a link when you have a photo of your origami rabbits!
Beautifull
Thanks
You are welcome Andrés!
Wow! This bunny is perfect! Looks like that it belongs to Easter, but It still holds eggs when your cooking with real eggs! How cute!
PS. I think that your right, paper folding cures finger stress. I tried it, and looks like it was true!
Hi Samantha, as long as you do not rush with your fingers, paper folding is very relaxing ;-)
WOW!! So cute and perfect time to learn it. THANKS
You are welcome Elsa Lucia. I’m happy you like this origami rabbit!
Excelente trabajo para que lo realicen mis estudiantes.Muchas gracias y sinceras felicitaciones a su creador.
Con todo gusto Nelly. Sabías que hay versión en español de este sitio web?
Puedes visitarlo aquí: https://www.origamispirit.com/es/
Y para este artículo en particular este es el enlace:
https://www.origamispirit.com/es/2014/02/conejo-en-origami/
Leyla the teacher David the creator … perfect harmony for a most wonderful model. I absolutely love it and had admired David’s bunny container for a long time; and now, here it is taught with your usual grace and impeccable style, Leyla. I am running out of adjectives :-)
Congratulations to both of you and please know the joy you will bring to all who receive this little bunny!
Rosemary AKA Brownee :-)
Thank you for suggesting this delightful origami rabbit for a video, Rosemary!
Very cute! When I was a child we always dyed our Easter eggs with onion skins so they were still edible. The yellow skins make beautiful gold and brown eggs and the purple onion skins, hues of blue and violet. I’ve been experimenting with other natural dyes lately too: Turmeric (fresh root or dried powder) and marigold flowers (also fresh or dried petals) both yield beautiful and vibrant yellow/golds. The water from soaking black beans overnight makes a pretty sky blue, and avocado pits and skins create the most astonishing and lovely dusty rose!
Thank you Tara for contributing all these excellent sources of color!!
Es precioso, gracias!
Emy
Con todo gusto :-)
A new bunny! So cute, and a perfect egg holder. You never cease to amaze me! Thanks so much!
Thank you Dawn. I’m very happy you like this. It was a fun post and video to make.