


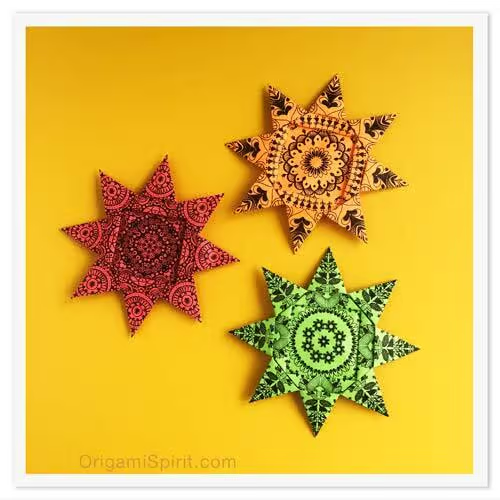
Two squares of paper, a few minutes of joyful paper-folding meditation, a lovely mandala design… an origami star is born! If you’ve ever made an origami figure using the windmill base, this eight-pointed star should be a breeze to fold. I’m excited to share with you this origami star of my own design.
I named this model ‘Star of Gratitude’ because gratitude is the feeling I have as I think of all the wonderful people with whom I can share this delightful passion. Your visits and your messages are always read and appreciated, and they keep me going!
Also, I had fun creating some perfectly symmetrical and printable mandala designs, that can be used for this star model for a great effect. You can purchase these patterns here.
The eight-pointed star is made using two units that overlap diagonally, the short corners of one fitting into the pockets of the other. This is the step-by-step video tutorial showing how to make the Star of Gratitude.

Tips and suggestions for making the origami Gratitude Star
- In the video, the star is demonstrated using very thin paper called Kami.
- All kinds of papers can be used to make this star: recycled paper, regular office paper or fancier papers such as “Tant” or onion skin would make good choices.
- To make the star use two squares of paper sized 6 × 6-inch (15 × 15cm)
- The finished paper star shows one side of the paper in the front. It’s not necessary to use paper of a different color on each side.
- If you are just beginning your adventure in the art of paper folding, you might want to make a few stars using flat color paper, and then go ahead and use patterned paper. *UPDATE: Read the comments for a great idea contributed by Caroline Chun to facilitate folding with patterned paper.
- Make a collection of stars, featuring pictures of your family and loved ones in the central frame. Hang them on the Christmas tree.
- Take squares 1/4 of the size of the ones you used for the star. On them, write those things for which you feel grateful. Blintz-fold them (all corners to the center). Insert these gratitude notes at the center of each star, and place the stars on your holiday tree.
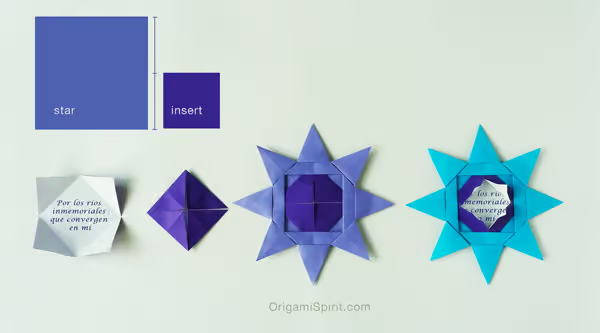
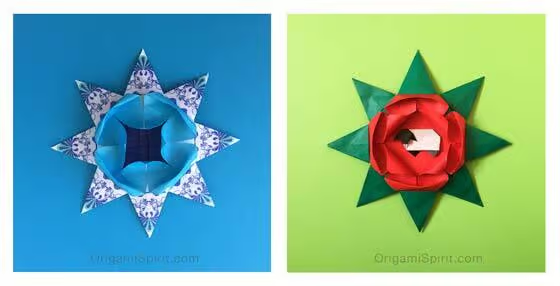
Star of Gratitude -6 Ways to Enhance it for Decoration
In this blog post, you will learn some other ideas to enhance the star by adding inserts. I invite you to experiment with making up some and having fun with them.
. . . . . . .
Arrange a group of stars on a wall in the shape of a Christmas tree.
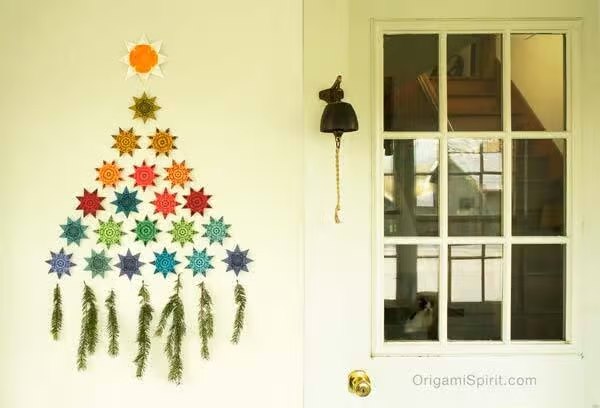
Can you see Lady Coco behind the door?
I noticed our little kitty’s presence only after I took the picture!
. . . . . . . . . .
Dear Leyla,
I love your origami and the star of gratitude is my favorite. I have made several of them and I give them away as I go for a walk in the neighborhood. You origami is beautiful and I thank you so much for sharing so that I can make beautiful things too. Well, I just finished one and will now go for a walk and give it to a friend who lives near me.
Phyllis
Hi Phyllis,
It makes me happy hearing that you enjoyed folding the Star of Gratitude. I hope your friend enjoys the gift of your company, walking together and the origami star.
Thank you for writing your warm note!
Dear Leyla,
You are THE BEST ORIGAMI TEACHER I KNOW and I LOVE THE STAR OF GRATITUDE. I just made another one and will go for a walk and give it away. As I said before YOU ARE THE BEST!!!!
I tried to copy and paste some smiley faces but it would not work! I wanted to show you how much your origami means to me! Well, I am off to give away another star of gratitude thanks to you!
Dear Phyllis,
I love your enthusiasm for origami. Thank you sharing with us and for your kind words.
Leyla
Dear Leyla,
This origami star is THE BEST ORIGAMI I have ever made and I cannot stop making them. I just made another one of them. I don’t even know how many of them I have made because I just keep making them and giving them away. Perhaps I will keep this one!
Phyllis
In such an uncomfortable time, remembering for what we are grateful is calming.
These Gratitude Stars are awesome! Once this (whatever THIS is) is over, I am to present a mindful drawing meditation on gratitude. I will work hard to get this star incorporated into the event.
Thank you & many blessings!
Ciao ❤️
patsy
Hi Patsy,
I’m very happy you like the Star of Gratitude and now you are thinking of incorporating it into your drawing.
I’m grateful for your words and your initiative of sharing about yourself here.
Welcome to Origami Spirit,
Leyla
Siempre me han gustado todos sus trabajos. Desafortunadamente perdí el que correo anterior y ya no supe màs de usted y sus trabajos. Afortunadamente nuevamente me conecto con usted. Ahora tengo un poco màs de tiempo, ya soy pensionada y tengo màs tiempo. Gracias
Hola Evangelina, siempre puedes recibir comunicaciones de Origami Spirit si te suscribes en esta página.
https://www.origamispirit.com/subscribe/
Desafortunadamente ya no estoy enviando publicaciones en español debido a limitaciones de mi tiempo. Pero siempre puedes obtener una traducción adecuada usando el traductor de Google que te muestro en un círculo rojo en la foto que encuentras en
https://www.origamispirit.com/wp-content/uploads/2020/03/OSp-Traductor.jpg
Thank you so much. You’re an excellent teacher.
Yor are welcome Tamara! :-)
Muchas gracias por tan bella idea….me encanta su equipo de trabajo especificamente la modelo coco….
ya voy a aplicar esta estrella para navidad en mi escuela…. asi como el mterial para trabajar con mis estudiantes….
Nos alegra que te guste lo que encuentras aquí. Abrazos de todos nosotros, especialmente de Coco!
Making this was hard but fun
Hola Leyla solo queria darte las gracias por tu sitio web es genial! tus tutoriales son una super ayuda. Te envio buenos deseos yo soy de Venezuela pero vivo en Inglaterra.
Siempre bienvenida a Origami Spirit, Zulay. Me alegra que te guste!
Leyla,
I just finished folding your Star of Gratitude – it turned out pretty well! We’ve been having lots of snow for several days, with a few power outages. Luckily, I was able to follow your tutorial all the way through. Now to just remember all the steps…..Happy Holidays to you, John & Coco!
Tess D.
Hi Tess,
I’m happy you were able to complete the steps. You too have a lovely holiday and a creative new year!
Love the concept of using the center for a photo. I think I will make some to celebrate the cats I have had over the years. Thanks for the design and video.
Hi Kitblu,
Glad you like the video! And aren’t we so grateful for the love and sweet feelings our pets bring us?
*A tip contributed by Caroline Chun: When making the star with patterned paper, it can be difficult to see some of the pinch marks to align the paper properly.
To help folding the four corners exactly to the center, keep one of the edges aligned at the center and fold the opposite corners to align with it. Then you can reverse the resulting diagonals to have the creases be mountain on the color side.
Here are the photos Caroline sent: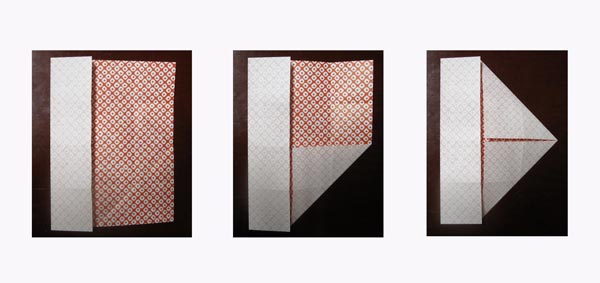
Dear Leyla,
Thank you very much for all the lovely models you teach. Great work.
Unfortunately, I cannot see the last video with the origami star of gratitude.
Must be a technical problem. I hope it can be fixed.
Very happy Xmas holidays for you and your family.
Hannelore
Hi Hannelore, here is a direct link to the video:
https://youtu.be/dfsv5XIal6A
Please let me know if you continue to experience difficulties
Perfect with the patterned paper, I love it! And there are so many things to be grateful about, I need to try it out…
I’m very happy you like it Wenche. Hopefully it will be an inspiration for one of your wonderful art compositions!
The windmill base is one of my favourites to “play”with, but so far I have never reversed the folds! Those stars will make lovely coasters and look very festive dotted around the Christmas table setting! Merry Christmas and Happy 2016!
Thank you Renee, best wishes too for a lovely Christmas and a great new year!