


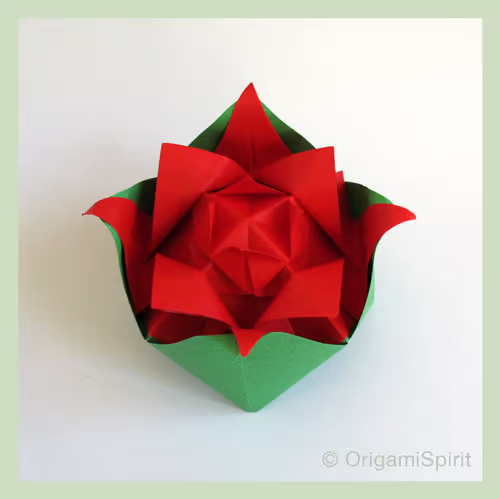
This origami rose design was derived from the traditional “Cootie Catcher” paper toy. It is made with three pieces of paper.
- The base is made up with a cootie catcher turned upside down and it forms the leaves. Paper size: 6 x 6 inches, green color on both sides.
- The middle piece form the larger petals. It is made from the windmill base and is nested inside the cootie catcher. Paper size: 6 x 6 inches, red color on both sides.
- The top piece form the smaller petals. It is made from the windmill base as well and is inserted inside the middle piece. Paper size: 3 x 3 inches, red color on both sides.
Origami Instructions: this is a very easy equation to solve!

I share this post and the video instruction for the origami rose in appreciation for all Origami Spirit subscribers and supporters. Thank you!
—————-
Read some articles related to the creation of this origami rose:
————
If you like what you find here, click here to subscribe to this blog,
and receive alerts for coming posts via e-mail –They are FREE!
excellent video…loved it. i am using this technique in my college project. thank you so much. :D
This rose is good for people to make
Dear Leyla
It’s a lovely rose …
And you are good teacher and very simple explan all you told..
Please make kawasaki rose …
I am trying many of you tube’s videos but ı don’t make but ı’m sure ıf you tell ı’m managed easyly..
Thanks for your smart activities and sharing with us…
Yay!
Finished it: http://pinterest.com/pin/349380883561675351/
I made an extra cootie catcher as a ‘vase’ for the rose; your latest creation makes me even more amazed at the possibilities from a simple traditional model.
Thanks for your creativity Leyla!
Oh beautiful!!! The extra vase looks fabulous! Thank you for sharing.
Ingenious – a beautiful reimagining of a rose, using traditional models in a totally new way! I love the clever way tension is used both to give individual pieces their shape and to hold them together as a whole.
Thankyou and congrats on reaching 1000!
:) B Rose
Congratulations, Leyla!! Your channel is a sucess and we win the present, thank you!!
Simple and beautiful !! Bravo !!